
Aviator Crochet Cardigan - Vintage Inspired Crochet
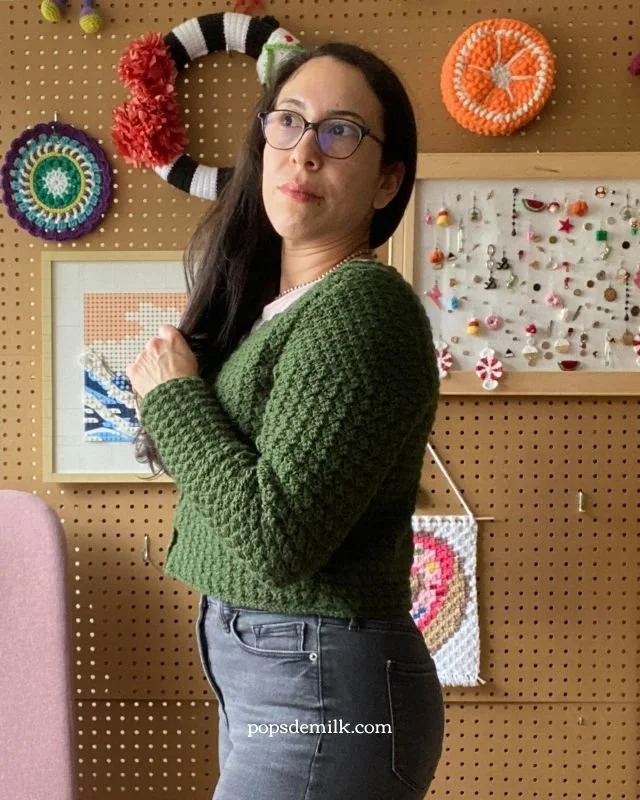
I’m beyond excited to share the finished Aviator’s Crochet Cardigan. Not gonna lie, it might just be my favorite garment I’ve ever made. Inspired loosely by vintage military jackets but softened with a 50s librarian vibe, this cardigan has turned out even better than I dreamed.
Soft, Feminine, and Full of Character
While the original idea came from that classic WWII Canadian battle dress jacket, the finished cardigan doesn’t feel structured or stiff. Instead, it’s soft and cozy. The kind of piece that wraps around you like a warm hug but still looks polished and put-together.
The army green color grounds it with that timeless, slightly rebellious edge. That olive green has been a go-to hue for me for years. Fun fact: I’ve had to consciously stop myself from buying too many olive green pieces but it just feels right with so much in my wardrobe.
I’ve already worn it with a floral skirt and a pink blouse, and it’s like a whole new level of feminine style. Then I threw on some jeans for a casual, everyday vibe and it looks just as a stylish.

Behind the Scenes: The Making of a Favorite
Designing this cardigan was a real journey; full of frogging, notes, and figuring things out as I went. I worked the sleeves and front panels simultaneously, adjusting as I tested fit and shape. It could be tedious at times, but all that back-and-forth made the finished piece just right.
I think every maker knows this feeling: sometimes you just have to trust the process, even if it means undoing and starting again. The patience pays off when you get to wear something that fits your style and feels like it was made exactly for you.
Styling My Aviator’s Cardigan
Feminine & Retro: Pair with skirts, soft blouses, or vintage-inspired pieces for a sweet, classic look.
Casual Cool: Throw it on with your favorite jeans and comfy shoes for a laid-back but chic outfit.
Year-Round Versatility: Layer it over tanks or tees in the spring or add a scarf and boots when it’s cooler.
What’s Next?
I’m already thinking about what to make next but this cardigan will definitely be getting plenty of wear. If you’ve been holding off on a more ambitious crochet garment, I hope this inspires you to take the leap. Remember, it’s okay to take your time, tweak your pattern, and trust the process.
Below I’m sharing the pattern instructions I used to fit my measurements. These serve as an example to guide you through making your cardigan using your own measurements.
These instructions have not been tested and I plan on making this again and adjusting the pattern as needed.

Aviator Crochet Cardigan Pattern Instructions
Materials
Brava Sport (2) weight yarn in Dublin, 5-6 skeins (approx. 500 grams)
3.75mm and 4.00mm hooks
Measuring tape
Stitch markers
Scissors
Buttons
My Measurements (for reference only)
Bust: 38”
Waist: 32”
Shoulder to waist: 18”
Shoulder to waist cardigan length: 19.5”
Armhole height: 7”
Back panel width: 19”
Front panel width: 9.5” per panel
Abbreviations (US Terminology)
ch - chain
sc - single crochet
hdc - half double crochet
dc - double crochet
inc - increase, 2 stitches in the same stitch
sc2tog - decrease, single crochet two stitches together
sl st - slip stitch
RS - Right Side
WS - Wrong Side
PM - Place Marker
Instruction Notes
The cardigan is made up of 2 front panels, 1 back panel, and 2 sleeves.
Panels are worked bottom up.
Important: These instructions are based on my specific measurements and serve as a guideline and inspiration to create your own cardigan.
Special Stitch Used: Sedge Stitch
The Sedge Stitch is worked in multiples of 3 plus 1, and additional 2 for foundation chain.
Start by making the number of chains needed.
Row 1: In the 3rd ch from the hook, work [1 hdc, 1 dc], *skip 2 ch, in the next ch work [1sc, 1 hdc, 1 dc]; repeat from * to the last 3 ch, skip 2 ch, sc in the last ch, turn.
Row 2: ch 1 (counts as sc), work [1 hdc, 1 dc] in the first st, * skip the next dc and hdc, work [1 sc, 1 hdc, 1 dc] in next sc, repeat from * to the last 3 sts, skip the next dc and hdc, sc in the top of the turning chain, turn.
Repeat Row 2
Cardigan Front panel, make 2
Starting with 3.75mm hook
Chain number needed to meet front panel width (ie. 9.5”). For my top I started with 45 chains (42 plus 1, and additional 2 chains for the foundation chain = 45 chains).
Row 1: (RS) In the 3rd ch from the hook, work [1 hdc, 1 dc], *skip 2 ch, in the next ch work [1sc, 1 hdc, 1 dc]; repeat from * to the last 3 ch, skip 2 ch, sc in the last ch, turn.
Row 2: (WS) ch 1 (counts as sc), work [1 hdc, 1 dc] in the first st, * skip the next dc and hdc, work [1 sc, 1 hdc, 1 dc] in next sc, repeat from * to the last 3 sts, skip the next dc and hdc, sc in the top of the turning chain, turn.
Rows 3-6: Repeat Row 2
Switch to 4.00mm hook
Repeat Row 2 to armhole. For me this is approx 10” from hem ending on a Row 1 (RS), turn. Cut yarn.
Armhole Shaping
Row 1: (WS) PM 3” from the edge, between 4th and 5th cluster, or desired distance.
Join yarn in sc of 4th cluster and in the same stitch work [1 sc, 1 hdc, 1 dc], * skip the next dc and hdc, work [1 sc, 1 hdc, 1 dc] in next sc, repeat from * to the last 3 sts, skip the next dc and hdc, sc in the top of the turning chain, turn.
Row 2: (RS) ch 1 (counts as sc), work [1 hdc, 1 dc] in the first st, * skip the next dc and hdc, work [1 sc, 1 hdc, 1 dc] in next sc, repeat from * to the last 3 sts, skip the next dc and hdc, sc in the top of the turning chain, turn
Rows 3-6: Repeat Row 2 ending at neckline edge, for me this is approx. 3”. Do not cut yarn.
Neckline Shaping
Mark where neckline shape will start(ie. 1” from edge)
Row 7: ch 1, skip the first stitch, in next sc work [sc, hdc, dc], continue in established pattern across toward the armhole edge.
Row 8: ch 1 (counts as sc), work [1 hdc, 1 dc] in the first st, * skip the next dc and hdc, work [1 sc, 1 hdc, 1 dc] in next sc, repeat from * to the last 3 sts, skip the next dc and hdc, sc in last st, skipping the turning chain, turn.
Rows 9-10: Repeat Rows 7 and 8
If you want to keep bringing in the neck you can repeat Rows 7-8 as desired.
Work even until you reach your desired length to shoulder (ie. The total length of my cardigan is 19”).

Back
Starting with 3.75mm
Chain number needed to meet back panel width (ie. 19”), for my top I started with 90 chains (87 plus 1, and additional 2 chains for the foundation chain = 90 chains)
Row 1: (RS) In the 3rd ch from the hook, work [1 hdc, 1 dc], *skip 2 ch, in the next ch work [1sc, 1 hdc, 1 dc]; repeat from * to the last 3 ch, skip 2 ch, sc in the last ch, turn.
Row 2: (WS) ch 1 (counts as sc), work [1 hdc, 1 dc] in the first st, * skip the next dc and hdc, work [1 sc, 1 hdc, 1 dc] in next sc, repeat from * to the last 3 sts, skip the next dc and hdc, sc in the top of the turning chain, turn.
Rows 3-6: Repeat Row 2
Switch to 4.00mm hook
Repeat Row 2 to armhole, (for me this was approx 10” from hem) ending on a Row 1 (RS), turn. Cut yarn.
Tip: Use the front panel as a guide to place markers in the same spaces as the armholes. Work even until you reach your desired length to shoulder (ie. The total length of my cardigan is 19”).
Note: The back does not have neck shaping.
Sleeves, make 2
Starting with 3.75mm
Chain number needed to fit comfortably around your wrist. For me this was 45 chains.
Rows 1-6: Work in established pattern (42 sts)
Switch to 4.00mm hook
Row 7-18: Work in established pattern
Row 19: inc row - ch 1 (does not count as a sc), 2sc in first stitch, sc in each st across, 2sc in last st (tch), turn (45 sts)
Row 20: ch 1 (counts as sc), work [1 hdc, 1 dc] in the first st, * skip the next 2 sc, work [1 sc, 1 hdc, 1 dc] in next sc, repeat from * to the last 3 sts, skip the next 2 sc, sc in last st, turn (46 sts)
Row 21-23: ch 1 (counts as sc), work [1 hdc, 1 dc] in the first st, * skip the next dc and hdc, work [1 sc, 1 hdc, 1 dc] in next sc, repeat from * to the last 3 sts, skip the next dc and hdc, sc in the top of the turning chain, turn (46 sts)
For the remaining rows, repeat Rows 19-23 until you reach your desired armhole circumference. Below I have shortened the rows but shared them for reference.
Row 24: inc (48)
Row 25-28: WE (49)
Row 29: inc (51)
Row 30-33: WE (52)
Row 34: inc (54)
Row 35-38: WE (55)
Row 39: inc (57)
Row 40-43: WE (58)
Row 44: inc (60)
Row 45-48: WE (61)
Row 49: inc (63)
Row 50-61: WE (64)
Do not cut yarn.
Shoulder Cap Shaping
PM in sc of 4th cluster from the beginning of row, PM in dc of 4th cluster from the end of row.
Row 62: do not ch, sl st to marked st, ch 1 (counts as sc), work [1 hdc, 1 dc] in same st, * skip the next 2 sts, work [1 sc, 1 hdc, 1 dc] in next st, repeat from * ending with sc in marked st, turn leaving remaining stitches unworked (43)
Row 63: ch 1 (counts as sc), work [1 hdc, 1 dc] in first st, * skip the next 2 sts, work [1 sc, 1 hdc, 1 dc] in next sc, repeat from * to the last 3 sts, skip the next 2 sts, sc in the top of the turning chain, turn (43)
Row 64: dec row - ch 1 (does not count as a st), skip first st, sc2tog in the dc and hdc at the start, sc in each st across to last 3 sts, sc2tog in the dc and hdc at the end of the row, skip the turning chain, turn (39)
Row 65: ch 1 (counts as sc), work [1 hdc, 1 dc] in first st, * skip the next 2 sts, work [1 sc, 1 hdc, 1 dc] in next sc, repeat from * to the last 2 sts, skip the next st, sc in the last st, skip the turning chain, turn (40)
For the remaining rows, repeat Rows 64-65 until you reach your desired shoulder width (ie. 4”). Below I have shortened the rows but shared them for reference.
Row 66: dec (36)
Row 67: WE (37)
Row 68: dec (33)
Row 69: WE (34)
Row 70: dec (30)
Row 71: WE (31)
Row 72: dec (27)
Row 73: WE (28)
Row 74: dec (24)
Row 75: WE (25)
Row 76: dec (21 sts)
Row 77: WE (22 sts)
Row 78: dec (18 sts)
Row 79: WE (19 sts)
Row 80: dec (15 sts)
Cut yarn and weave in the ends.
Putting the Cardigan Together
Sew the front and back panels together at the shoulder.
Fold the sleeves lengthwise, matching the edges, and sew the sleeve to the last row before the shoulder cap shaping (ie. Row 61) or where the armhole will be.
With the cardigan inside out, sew the side seams together starting from the bottom hem and working up to the armhole.
Still working inside out, insert the sleeve (right side out) into the armhole opening so the front and back panel right sides are touching the sleeve right side. Sew the sleeve edge around the armhole. Repeat on the other sleeve.
Neckline, Front and Bottom Border
Before starting this step, decide which panel will have the button holes. See instructions on Creating Button Holes.
Neck
With right side facing, join yarn at back of neck and single crochet along the neck stitches, evenly working into row edges.
First Front Panel
When you reach the front panel edge, ch 1, sc down first front panel, turn, ch 1, sc back up front panel, turn, ch 1, sc back down toward bottom hem, do not turn.
Bottom Hem
ch 1, evenly sc along the bottom edge to the opposite front panel.
Second Front Panel
Repeat steps to work 3 rows of sc stitches or button holes.
Creating Button Holes
Use stitch markers to mark where the button holes will go.
In the panel where the button holes will go, work the first row of sc as described above.
In the second row, sc to first button hole marker, ch 2 (or 3 depending on the size of your buttons), skip 2 (or 3) sts, sc in next stitch, repeat across, turn.
ch 1, sc in each st across, working 2 (or 3) sc in each ch space.
Finishing Touches
Sew the buttons to your cardigan, carefully aligning with the button holes.
Block if needed and your cardigan is ready to wear!
*****
This pattern is for personal use only. The pattern and its photos may not be reproduced, distributed or resold, translated, published, altered, shared or posted in any way over the internet or offline.
You may sell finished items made from this pattern as long as it is handmade by you, not mass produced, giving the credit to Pops de Milk / Patricia Castillo as the designer. If you have any questions, you can email me at patricia@popsdemilk.com