
Garden Trellis Crochet Top
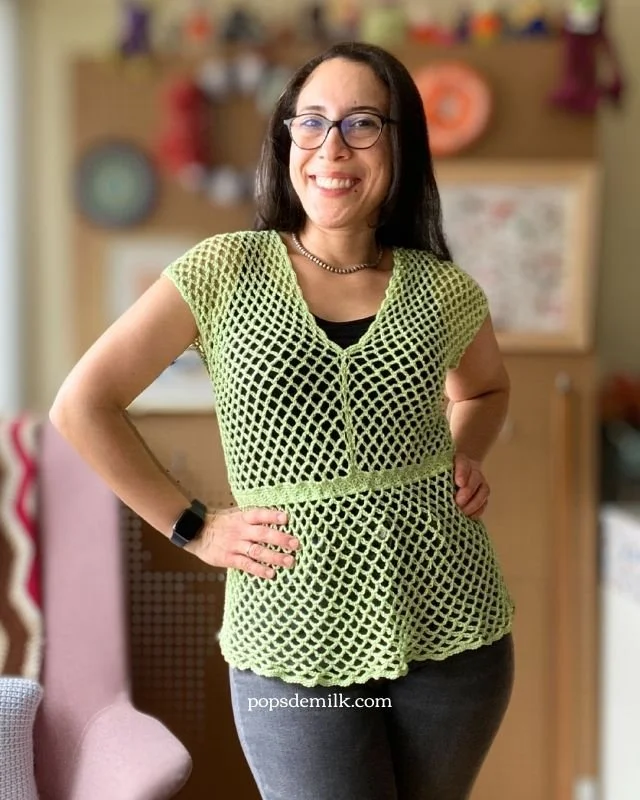
After playing around with some leftover yarn, I decided to make a fresh take on the trellis stitch top I’d started. This time, I picked up this gorgeous lime green Patons Grace Mercerized Cotton that’s a softer, lighter DK weight yarn perfect for spring and summer.
Though it’s labeled the same weight as my prototype yarn, this one’s a little thinner, so I knew I’d need to tweak my measurements and stitch counts. The good news is the trellis stitch is wonderfully forgiving and stretchy, so it molds nicely to the body, giving a comfortable yet flattering fit.


Starting with the Prototype
Before getting started, I measured my prototype, which is about 9 inches wide per panel and 13 inches long. For this new version, I wanted to go for a slightly longer length, about 16 inches, for a bit more coverage and flow.
Instead of counting stitches from the start, I chained until I reached the desired 9-inch width, checking as I went. Then I counted my stitches to work out the right foundation chain length: multiples of 4, plus 3 and an additional 3 for the foundation chain, ending up with 54 chains.
Building the Trellis Stitch Panels
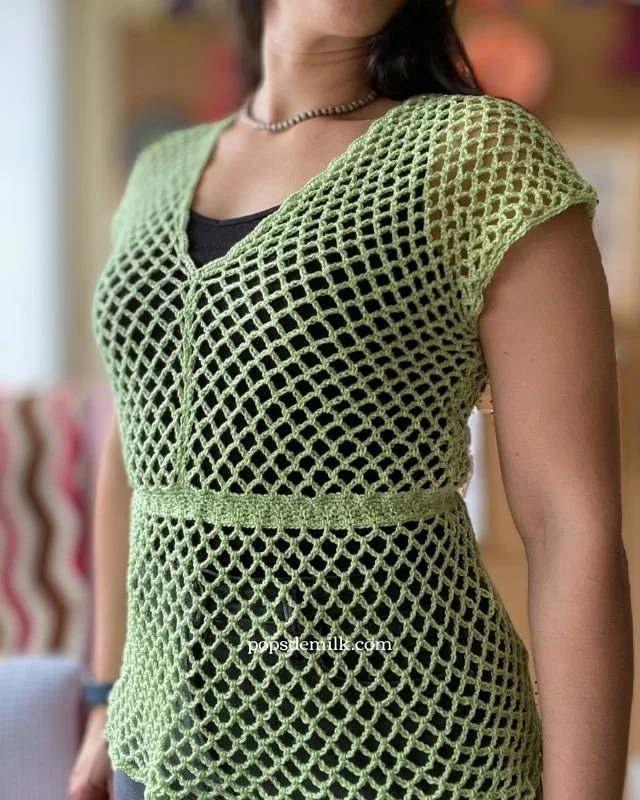
The trellis stitch is made up of a simple pattern: single crochet, chain 5, skip 3 chains, single crochet and repeat across the row. On the following row, chain 5, single crochet in the chain-5 space below, and keep repeating.
I worked back and forth like this until the panel reached my target length, then made a second panel just like it.
Check out my tutorial on how to crochet the trellis stitch for more details.
Joining and Shaping the Waist
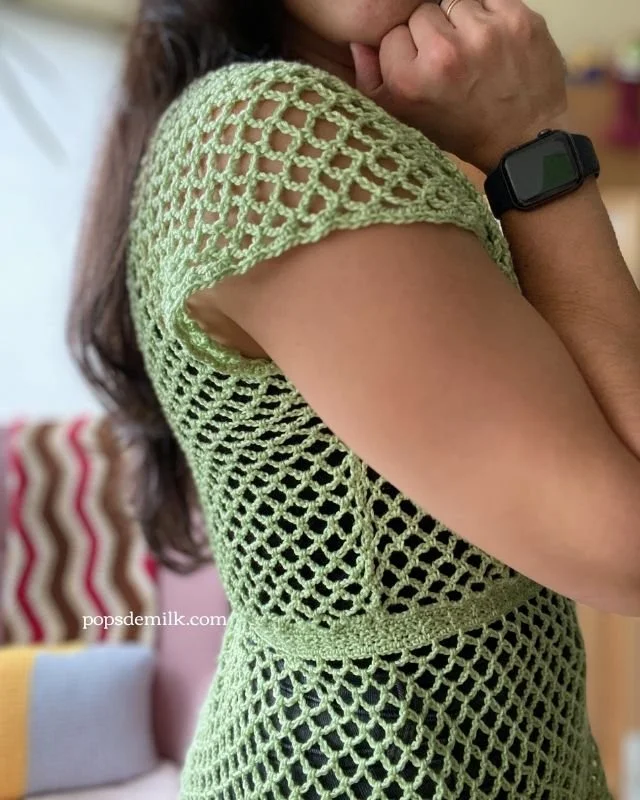
Next, I joined the two panels at the waist with single crochet stitches worked into the foundation chains and, folding the panels in half to form the shoulders, continued stitching into other edge of each panel. The trellis stitch is pretty much reversible, so don’t stress about which side is up here.
In my prototype, I had finished with a single crochet edge along the bottom, but for this version, I wanted a little more shape at the waist. So, I worked a ribbed hem using half double crochets in the back loops, creating a gentle gather that trims the waist nicely.
If you want to try this, I have a quick ribbed hem tutorial you can follow!
Finishing Touches
To finish the top, I sewed a thin elastic band inside the waist to give it a bit more definition. I also worked a scalloped edging around the neckline and sleeves by placing five single crochet stitches in each chain-5 arch. This gave the edges a delicate, feminine touch.
I sewed the side seams, trying it on as I went to make sure the top fit comfortably under the arms.

Tips & Tricks
Don’t stress about exact stitch counts: The trellis stitch is stretchy, so you can adjust as you go to fit your shape.
Keep your tension consistent: Not too tight or too loose to maintain a nice even mesh.
Use stitch markers: To keep track of length or waist placement on each panel.
Experiment with the waist: Ribbed hems or elastic bands help add shape if you want a peplum effect.
Scalloped edges: Use a simple single crochet stitch to add a pretty finishing touch that dresses up the mesh fabric beautifully
This Garden Trellis Top is simple to make yet so flattering and fun to wear. I hope it inspires you to try the trellis stitch in your next wearable project!
If you want to see the whole making-of journey — including my measurements, stitch tips, and design process — check out my video and find the suggested instructions below!
Garden Trellis Crochet Top - Sample Pattern
Skill level: Advanced Beginner
Finished size: Approx. 16” length x 18.5” width
Yarn: Patons Grace Mercerized Cotton in Ginger (or similar DK weight cotton yarn)
Hook: 3.00mm crochet hook
Notions: Stitch markers, yarn needle, measuring tape, thin elastic (¼” or desired width) (optional)
Abbreviations (US terms)
ch = chain
sc = single crochet
hdc = half double crochet
st = stitch
rep = repeat
sl st = slip stitch
sk = skip
Sizing and Notes
For reference, my measurements are:
Bust: 37”
Waist: 31”
The trellis stitch panel width is worked in multiples of 4 plus 3 for foundation chain.
The panels are worked flat in rows, turning at the end of each row.
The trellis stitch creates a stretchy mesh fabric that fits the body nicely.
Use a measuring tape to track length and width rather than counting exact stitches for the best fit.
Optional elastic at waist helps add shape and support.
This top is made up of 2 long panels that are sewn together at the centre back and front and sides.
Panels, make 2
Chain the number needed to match your shoulder width (e.g., 9”). For my top, I started with 54 chains (48 + 3 + an additional 3 for the foundation chain = 54 chains).
Row 1: sk first 5 chains and sc in 6th ch from hook, * ch 5, skip 3 ch, sc in next st, repeat from * across ending with sc in the last ch, turn
Row 2: * ch 5, sc in next ch-5 arch, repeat from * across ending with sc in the last ch-5 arch, turn
Repeat Row 2 until the panel reaches your desired length (for me, this was about 32”). Cut yarn and weave in ends.
Joining the Panels at the Waist
Lay the panels flat, side by side. Join yarn at the first or last stitch of the foundation chain on either panel. Right or wrong sides don’t matter here.
Work single crochet stitches into each foundation space across the first panel, then continue directly into the foundation row of the second panel.
At the end of the row, continue working into the last row of the second panel, then the last row of the first panel.
Join with a slip stitch to the first single crochet. Do not cut yarn.
Options
Option 1: Work a few rounds in single crochet and fasten off to make a simple cropped top.
Option 2: Add a ribbed waist and continue with trellis stitch rounds to make a longer top with a peplum hem (see next sections).
Ribbed Waist
Row 1: ch 4, hdc in 2nd chain from hook and in remaining chains. Work into the single crochet stitches from the panel join round: slip stitch in the next 3 stitches. Turn. (3 hdc sts)
Row 2: Without chaining, hdc in the back loop only of each stitch across. Turn.
Note: Be careful to work only into the hdc stitches and not the slip stitches.
Row 3: ch 1, hdc in the back loop only of each stitch across, working into the sc round; slip stitch in the next 3 stitches. Turn.
Repeat Rows 2 and 3 all the way around the waist. Do not cut yarn.
Depending on the number of rows you work, your last stitch might point toward the top of the waist. To fix this, slip stitch through both layers of the first and last row of the ribbing to close the gap and orient your hook toward the bottom.
If it already points downward, you can sew the first and last rows together later with yarn.
Work single crochet evenly into the hdc row edges around the waist, making sure the total stitch count is a multiple of 4.
Peplum Hem
Work trellis stitch pattern in rounds:
Round 1: * ch 5, skip 3 sts, sc in next st, repeat from * around ending with sc in the last sc, do not turn
Round 2: sl st to first ch of ch-5 arch, ch 5, sc in the same ch-5 arch, * ch 5, sc in next ch-5 arch, repeat from * around ending with sc in the first ch-5 arch, do not turn
Round 3: * ch 5, sc in next ch-5 arch, repeat from * around ending with sc in the last ch-5 arch, do not turn
As you work rounds you’ll alternate between ending the round on the first or on the last ch-5 arch.
Work until you reach your desired length. For my top I worked 22 rounds. Do not cut yarn.
End the last trellis stitch round by working a sc into the center chain of the ch-5 arch, then
ch 1, sc in the next 2 ch, * sc in the next sc, work 5 sc in the next ch-5 arch, rep from * end with sl st to join.
Cut the yarn and weave in the ends.
Finishing the Top
Use a yarn or embroidery needle to sew the front, back, and side seams together to your desired fit.
Trim (optional)
You can add a round of single crochet stitches around the neck and armholes to give the top a subtle scalloped edging.
Join the yarn in any stitch on the neck or armholes, work 5 sc in each ch-5 sp, work 1 sc in each sc, join with a sl st. Cut yarn and weave in ends.
Elastic Band (optional)
Sew a thin elastic band inside the waistline for added shaping and support.
***
This pattern is for personal use only. The pattern and its photos may not be reproduced, distributed or resold, translated, published, altered, shared or posted in any way over the internet or offline.
You may sell finished items made from this pattern as long as it is handmade by you, not mass produced, giving the credit to Pops de Milk / Patricia Castillo as the designer. If you have any questions, you can email me at patricia@popsdemilk.com