
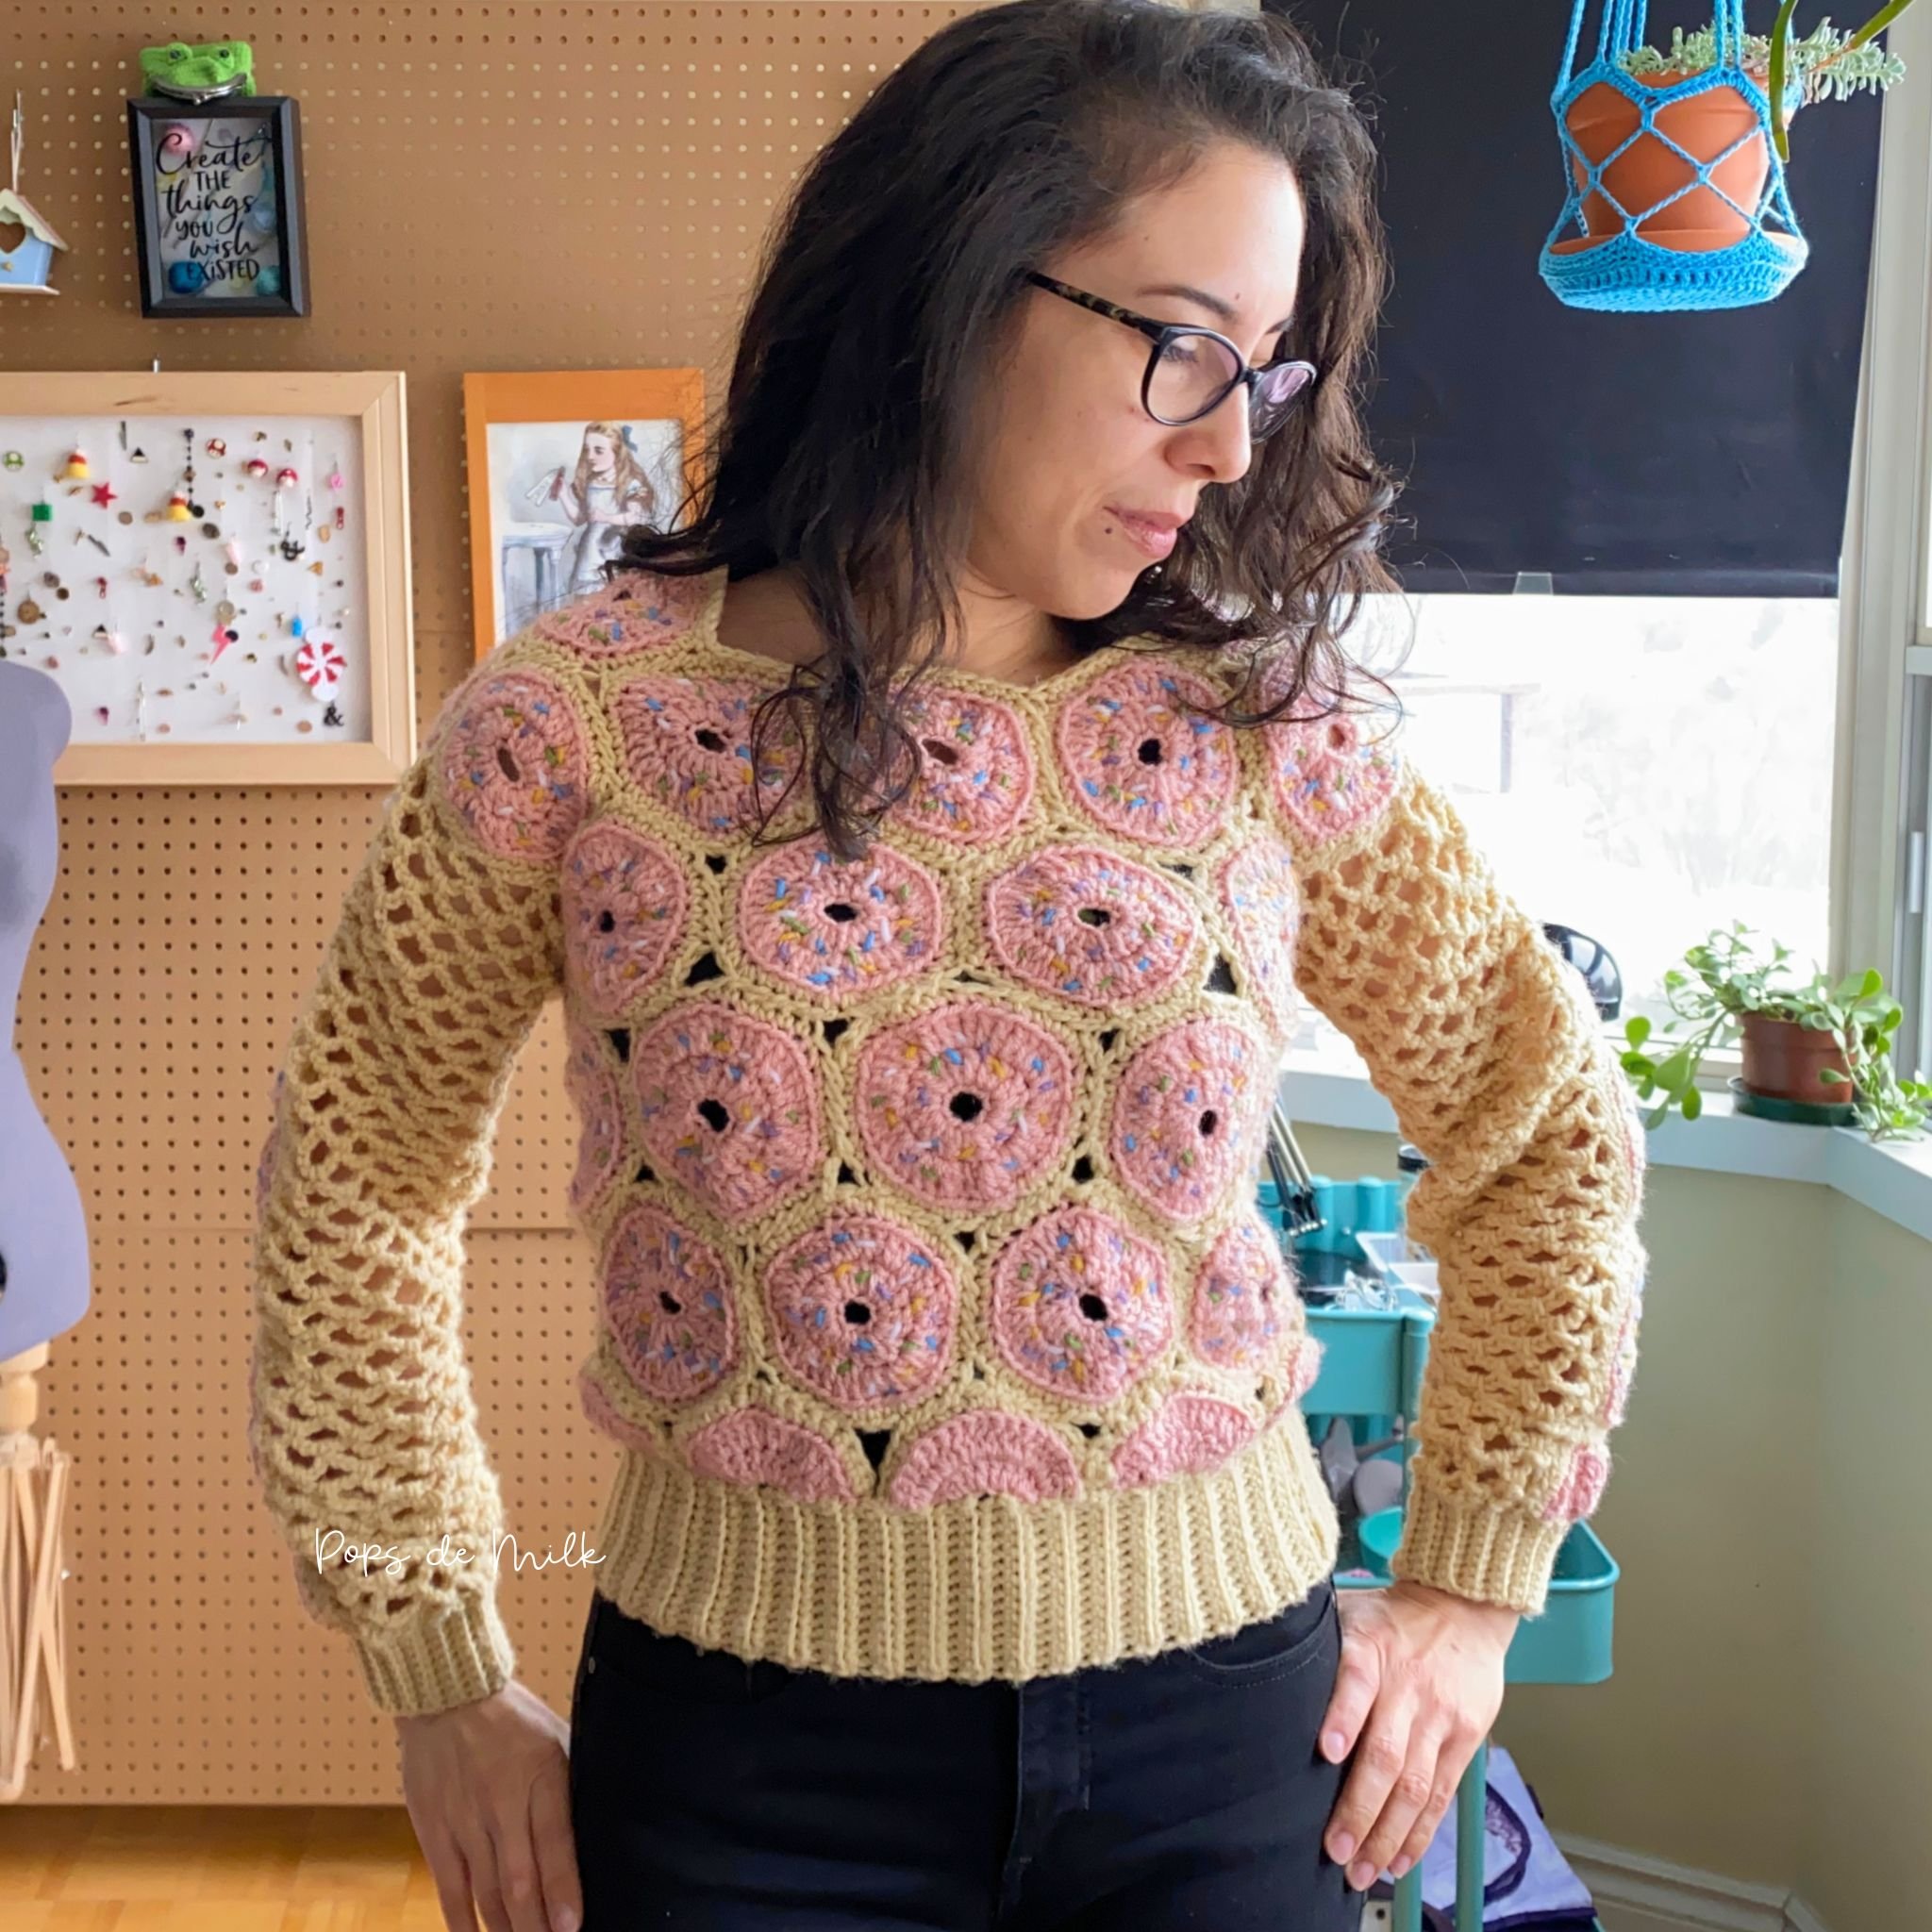
Donut Sweater Crochet Pattern + Video
Are you ready to add some fun and nostalgia to your wardrobe? Crochet fashion has been making a comeback in recent years, and what better way to show off your love for the 80s than with a crochet donut sweater! Inspired by the bubble pink pop attitude of the decade, this sweater is a perfect mix of whimsy and style. With its unique shape and bright colors, this donut sweater will make you stand out in a crowd.
This project is sure to be a fun and rewarding challenge. In this blog post, I'll give you a behind the scenes look at the inspiration behind this crochet donut sweater, discuss the materials and techniques needed to create it, and provide you with the donut pattern to get you started.
So, grab your hook and yarn, and let's get started on creating a piece that is sure to turn heads and bring a smile to your face!

I had the idea to make a donut sweater for several months. I think it was after I made my original donut pillow that I discovered how much I love crochet donuts. Then, in December, my friends and I had a booth at an art show where our booth theme was a bakery. We all made something donut-related and after making so many donuts you would think I’d get tired of making them. I mean, a little tired but the idea of wearing a donut lingered. That’s how I knew I had to make this dream come true.
I chose pink for the icing because that’s my donut preference but I am curious what this would look like with chocolate icing or multicolored donuts!
I hope you enjoy this crochet donut sweater and that it inspires you to crochet something sweet!
Donut Sweater
Crochet Pattern
Skill Level
Intermediate/Advanced
Size
Measured flat and without stretching, this donut sweater measures approximately:
A - 29" around the bottom ribbed edge
B - 36" around at the armholes
C - 21" from bottom ribbed edge to neck/shoulder
D - 40” across from shoulder edge to shoulder edge
E - 19” sleeve length from shoulder to ribbed edge.

Each donut measures approx. 4.5” in diameter.
To adjust the sizing for your measurements you will need to calculate how many donuts you need to meet those measurements. For example, my hips are 40” and if each donut is 4.5” I would need 9 donuts to fit around my hips.
When it comes to the bust and shoulders, I added an extra donut (total of 10 donuts) to even things out for the armhole openings.
Materials
Worsted weight (4) acrylic yarn. For the pink icing I used Vanna’s Choice in Pink and for the donut bread part I used Bernat Super Value in Oatmeal. For the sprinkles I used scrap yarn in yellow, white, purple, green, and blue.
4.50mm and 5.00mm crochet hooks
Stitch marker
Yarn needle
Measuring tape
Abbreviations (US terms)
ch - chain
st(s) - stitch(es)
sc - single crochet
BLO - back loop only
sl st - slip stitch
dc - double crochet
sk - skip
rep - repeat
Gauge
Each donut measures approx. 4.5” in diameter.
Trellis stitch for sleeves - 3.5 chain spaces, 10 rows = 4” x 4”
Notes
The sweater is made up of donuts that are sewn together. Ribbing is crocheted to the half donuts after they have been joined together. Blocking is not necessary but depending on the type of yarn you use it might be good to do so. When you have the number of donuts you need you can start sewing the sprinkles on to each donut. I recommend you do this before joining the donuts together to make things easier (yes, I learned this the hard way).
Pattern
Full Donut
Using 5.00mm hook
Starting chain does not count as a stitch.
With Pink ch 9, join with sl st to first st to form ring
Round 1: 2dc in each st (18 sts)
Round 2: 2dc in each st (36 sts)
Switch to Oatmeal
Round 3: working in BLO sc in each st
Cut yarn and weave in ends.
Half Donut
Using 5.00mm hook
Starting chain does not count as a stitch.
With Pink, ch 6
Row 1: 2dc in 3rd ch from hook and next ch, 3dc in next ch, 2dc in the next ch, turn
Row 2: ch 2, 2dc in each st, turn
Switch to Oatmeal
Row 3: ch 1, working in BLO sc in each st
Cut yarn and weave in ends.
Once you have your donuts ready you can arrange them and start sewing. Arrange all your half donuts along the bottom and work up with the full donuts.

Bottom Ribbing
Using 4.50mm hook
With Oatmeal, join yarn in any half donut edge and chain 14. You can adjust this to your preference but this number chains results in a 3” wide ribbing.
sc in the second ch from hook and each ch across back to the donut edge. When you get to donut edge, evenly slip stitch twice along the edge. Do not make a starting chain, turn.
Make sure you don’t work your stitches into the slip stitches from the the previous row. Working in BLO, sc in each st across, turn, ch 1 (13 sts)
In BLO, sc in each st across back to the donut edge and again evenly slip stitch twice along the edge. Do not make a starting chain, turn.
Repeat steps 3 and 4 until you have worked all the way around and back to the beginning. Use a yarn needle to sew the seams together or use a hook to slip stitch the edges together.
Sleeves
Start by making the trellis mesh panel. The trellis stitch uses multiples of 4 + 2. The first row, without stretching, measures 9.5". To adjust the size you can add or remove the number of starting chains accordingly.
Row 1: ch 42, sc in 6th ch from hook, *ch 5, skip 3 ch, sc in next ch, *rep to end, turn.
Row 2: *ch 5, sc in next ch-5 space *repeat to end making last st in top of turning chain, turn.
Repeat row 2 until desired length is reached. For my sleeves I worked a total of 42 rows.
Assembling the Sleeves
Join the donuts you’ll be using for your sleeves. For my sweater I had 4 full donuts and 1 half donut at the wrist. Arrange them in a line and sew them together at the top and bottom edges so you have a line of donuts with the half donut at the end.
With the trellis panel, evenly sew the line of donuts so that they’re nestled between the trellis panel edges, as pictured:

Repeat the same ribbing steps above on the sleeves. When your sleeves are done you can sew them into the armhole openings on the sweater.
You can add finishing touches like a round of single crochet stitches along the neckline if you like and once you have weaved in all your ends, your donut sweater is finished and ready to wear!


If you make this crochet donut sweater I'd love to see your creation, just tag me on Instagram @popsdemilk_crochet and use the hashtag #popsdemilk
Looking for more crochet patterns? Then you might like these:
**********
This pattern is for personal use only. The pattern and its photos may not be reproduced, distributed or resold, translated, published, altered, shared or posted in any way over the internet or offline.
You may sell finished items made from this pattern as long as it is handmade by you, not mass produced, giving the credit to Pops de Milk / Patricia Castillo as the designer. If you have any questions, you can email me at patricia@popsdemilk.com
This post contains affiliate links.