
Bernie's Mittens Crochet Pattern
Like many knitters and crocheters, the moment I saw Bernie's mittens I knew I needed to make myself a pair. How would I make a Bernie's mittens crochet pattern? I searched for a pattern but learned that Bernie's mittens were actually made from old sweaters that were cut out and sewn together. This meant I needed to start from scratch. I was trying to think of how to use my crochet mittens pattern and still come out with the same look and feel. This is when I realized I needed to make them as though I had cut out the pieces from old sweaters. Thankfully, other creators were quick to figure out a color graph and I found Alyssa Coffey's graph on Ravelry. Thank you Alyssa!!
Now on to the free crochet pattern!

Bernie's Mittens
Crochet Pattern
Disclaimer:
This pattern has not been tested and was created in a spur of inspiration from the online crochet community and Alyssa Coffey who was able to quickly put together a FREE knitting graph to follow. This is my crochet version of the Bernie mittens.
Sizing
These mittens are approx. 9 inches in length from cuff to tip and fit on the snug size. You can adjust the size by using a larger/smaller hook, adjusting your tension, and/or adding/removing stitches to the cuff and mitten length.
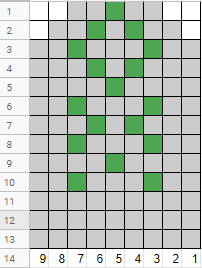
Colorwork
I adjusted the pattern slightly by removing one column in the chart to make it 19 stitches across instead of 20.
Color changes happen when pulling the new color through the loops in the previous stitch. Carry the yarn through the rows for a consistent and thicker fabric. Keep the strands in the back when working on the front side (right side) and keep the strands in the front when working on the inside (wrong side).
Mittens Structure
Mitten front and back are worked separately in rows and then the seams are sewn together along with the thumbs.
Materials
3.5 mm crochet hook
3.75 mm crochet hook
Yarn needle
For the yarn I used acrylic (Bernat Super Value and Red Heart Super Saver). A lot of these were in my scrap yarn stash so I've done my best to remember what the color names were:
A - Taupe
B - Honey
C - White
D - Oatmeal
E - Chocolate
F - Windsor Blue
G - Light Grey
H - Paddy Green
Cuff
With smaller hook and A
Row 1: ch 11, sc in 2nd ch from hook and each ch across, turn (10 sts)
Work in BLO throughout
Row 2: ch 1, sc in each st across, turn
Repeat until there are 38 rows, approx. 7.5". Fasten off A and weave in ends.
Mitten - Front
With larger hook and B
Turn the cuff so it's lengthwise to work stitches in the sides of the rows.
Fold in half and place marker in center (stitch 19). Determine which side will be the inside/outside and follow the graph on Ravelry or a design of your choosing/making.
Row 1: ch 1, sc in each row to marker, turn leaving remaining stitches (19 sts)
Rows 2-26: ch1, sc across making color changes, turn.
Row 27: ch 1, dec in first two stitches, sc across, dec in last two stitches, turn (17 sts)
Row 28: ch 1, sc across, turn.
Rows 29-33: Repeat Row 27 (7 sts)
Fasten off and weave in ends.
Mitten - Inside
With larger hook and F
Row 1: Pick up a stitch in the center to work in the remaining stitches, turn (19 sts)
Row 2: ch 1, sc in each st across, turn
Rows 3-26: Repeat Row 2
Row 27: ch 1, dec in first two stitches, sc across, dec in last two stitches, turn (17 sts)
Row 28: ch 1, sc across, turn.
Rows 29-33: Repeat Row 27 (7 sts)
Fasten off and weave in ends.
Thumbs - Front
With larger hook and G and H
Thumbs are worked from the tip down following color changes in graph.
Row 1: ch 4, sc in the 2nd ch from hook and each ch across, turn (3 sts)
Row 2: ch 1, inc in the first st, sc across, inc in the last st (5 sts)
Rows 3-4: Repeat Row 2 (9 sts)
Row 5: ch 1, sc across, turn.
Rows 6-12: Repeat Row 5
Row 13: do not ch 1, sk first st, sl st in next st, sc in next 2 sts, hdc in next st, dc in next 2 stitches. Fasten off and weave in ends.
Thumbs - Inside
With larger hook and F
Repeat Thumbs - Front pattern. Fasten off and weave in ends.
Assembly
If you are making a liner for the mittens, I suggest tracing the shape before sewing the mittens together so you can see how it will fit inside.
Using A, whip stitch the main mitten seams leaving a gap for the thumbs. I placed my thumb pieces roughly between Rows 8 and 14 but this will depend on your own preference and size.
Using A, sew the thumb seams then attach to the front mitten piece with A, and use F for the inside so the seam colors match.
And your Bernie mittens are complete and ready to keep your hands toasty!


If you make Bernie’s mittens I'd love to see your creation, just tag me on Instagram @popsdemilk_crochet and use the hashtag #popsdemilk
Looking for more warm crochet patterns? Then you might like these:
**********
This pattern is for personal use only. The pattern and its photos may not be reproduced, distributed or resold, translated, published, altered, shared or posted in any way over the internet or offline.
You may sell finished items made from this pattern as long as it is handmade by you, not mass produced, giving the credit to Pops de Milk / Patricia Castillo as the designer. If you have any questions, you can email me at patricia@popsdemilk.com