
Crochet Haikyuu Crow Amigurumi Pattern
This adorable crochet Haikyuu crow would not have been possible if a fan and supporter of handmade work had not requested it.
I was approached on Etsy to design and create a pattern based on a character from the manga series, Haikyuu. They sent me a photo of a plushie version and asked if I could make a crochet version!
Looking at the photo of the crow plushie I couldn't help but squeal with delight - the character looked so cute with its tiny legs compared to the chubby body!

After learning about Haikyuu, I got even more excited: it's a manga-turned-tv series about Volleyball!
The protagonists are two underdog boys out to prove to the older boys that they are the best at volleyball. They are from a high school called 'Karasuno', which means 'crow' in Japanese.
Not only is this Haikyuu crow the school animal, but he's also a fashion trend:

Designing the Crochet Haikyuu Crow
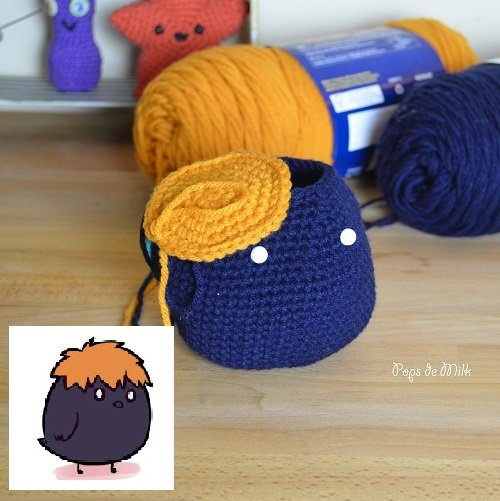
I had an idea of how I would make the body but the hair was something I knew I would have to figure out - how would I crochet points around a circle without making a bunch of tiny triangles?
It was a challenge I was only too happy to accept.
I could have made a circle and a bunch of individual triangles to sew on after but for me these are the kind of challenges that make the project more meaningful because it means I get to learn something new.
Plus, no one wants to sew a bunch of little triangles to a circle. No one.
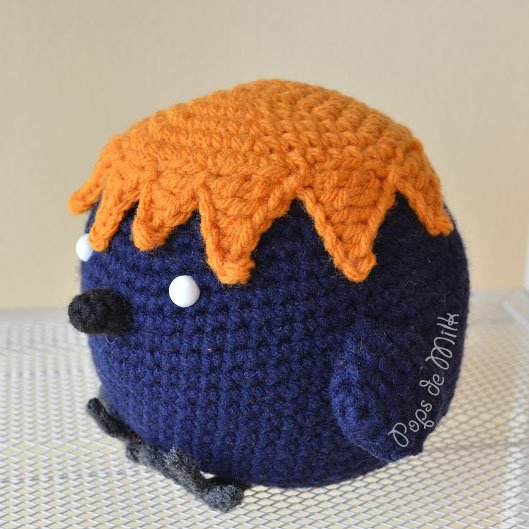
For the eyes I took a pair of plastic safety eyes and painted them with white acrylic paint - it took a few coats to get it just right.
I knew the beak had to be small, but it needed a touch of attitude and I think I got that. When it was all finished I couldn't stop grinning - it was so cute!

The feet were made separately and sewn on later. I really wanted them to be tiny compared to the body but not so tiny that they wouldn't be visible.

I shipped it off to its new home and a few days later I heard back from a very happy owner, "Thank you so much for making it exactly how I wanted." ❤️
PATTERN VARIATION UPDATE
I made a chunky version if you want a larger-sized crow. Check out the new variation and video on my YouTube channel!
Crochet Haikyuu Crow Amigurumi Pattern
Materials
Worsted weight (4) yarn, such as Bernat Super Value approx. 100g in Navy, small amounts of Bronze, Dark Grey, and Black.
3.75mm and 3.00mm crochet hooks
1 pair of 8mm safety eyes in white or black eyes that have been painted with white acrylic paint
Yarn needle
Polyester fiberfill for stuffing
Scissors
Stitch marker
Pattern Notes
Unless otherwise indicated, the pattern is worked in continuous rounds, do not join or turn at the end of each round.
Use stitch markers to keep track of rounds and increases.
As with most amigurumi projects keep tension on the tighter side to ensure close and secure stitches.
The placement of the eyes, beak, wings, and feet is entirely up to you.
This amigurumi is not intended for children under 3 years old as safety eyes pose a choking hazard. To make this safe for children under 3 years old consider embroidering the eyes with white yarn.
The finished size is approx. 6 inches tall.
Abbreviations (US Terms)
ch - chain
sl st - slip stitch
sc - single crochet
hdc - half double crochet
dc - double crochet
tr - treble crochet
dtr - double treble
inc - increase (2 sts in same st)
dec - decrease (sc2tog)
Body
The body is worked from the bottom up.
Use Navy Blue yarn and 3.75 mm hook.
Round 1: make 6 sc in a magic ring
Round 2: inc x 6 (12 sts)
Round 3: [sc in next st, inc] x 6 (18 sts)
Round 4: [sc in next 2 sts, inc] x 6 (24 sts)
Round 5: [sc in next 3 sts, inc] x 6 (30 sts)
Round 6: [sc in next 4 sts, inc] x 6 (36 sts)
Round 7: [sc in next 5 sts, inc] x 6 (42 sts)
Round 8: [sc in next 6 sts, inc] x 6 (48 sts)
Round 9: [sc in next 7 sts, inc] x 6 (54 sts)
Rounds 10-13: sc in each st around
Round 14: [sc in next 17 sts, inc in next st] x 3 (57 sts)
Round 15: sc in each st around
Round 16: [sc in next 18 sts, inc in next st] x 3 (60 sts)
Rounds 17-19: sc in each st around
Round 20: [sc in next 18 sts, dec] x 3 (57 sts)
Round 21: sc in each st around
Round 22: [sc in next 17 sts, dec] x 3 (54 sts)
Round 23: sc in each st around
Round 24: [sc in next 7 sts, dec] x 6 (48 sts)
Round 25: [sc in next 6 sts, dec] x 6 (42 sts)
Round 26: [sc in next 12 sts, dec] x 3 (39 sts)
Round 27: [sc in next 11 sts, dec] x 3 (36 sts)
Round 28: sc in each st around
Attach safety eyes and begin to stuff the body.
Round 29: [sc in next 4 sts, dec] x 6 (30 sts)
Round 30: [sc in next 3 sts, dec] x 6 (24 sts)
Round 31: [sc in next 2 sts, dec] x 6 (18 sts)
Round 32: [sc in next st, dec] x 6 (12 sts)
Round 33: dec x 6 (6 sts)
Cut the yarn and weave in the ends.
Wings, make 2
3.75mm hook
Round 1: make sc 6 in a magic ring
Round 2: inc x 6 (12 sts)
Round 3: [sc in next 2 sts, inc in next st] x 4 (16 sts)
Round 4: dec, sc in next 4 sts, dec x 2, sc in next 4 sts, dec (12 sts)
Round 5: sc in each st around
Round 6: [dec, sc in next st] x 4 (8 sts)
Round 7: dec x 4
Cut the yarn and leave a tail for sewing.
Note: The wings are not stuffed so they can keep a somewhat flat shape - flatten the wings using the decrease placements from Round 4 to know where the creases should be.
Hair
3.75 mm hook
Round 1: make 6 sc in a magic ring
Round 2: inc x 6 (12 sts)
Round 3: [sc in next st, inc] x 6 (18 sts)
Round 4: [sc in next 2 sts, inc] x 6 (24 sts)
Round 5: [sc in next 3 sts, inc] x 6 (30 sts)
Round 6: [sc in next 4 sts, inc] x 6 (36 sts)
Round 7: [sc in next 5 sts, inc] x 6 (42 sts)
Do not cut the yarn.
Create triangles by making a set of chains and alternating with sc, hdc, dc, tr, dtr. For example:
Triangle 1: ch 6, sl st in 2nd ch, hdc in next ch, dc in next ch, tr in next ch, dtr in next ch, skip 4 sts on circle piece and sl st in next st.
Triangle 2: ch 6, sl st in first ch, sc in next ch, hdc in next ch, dc in next 2 ch, skip 2 sts on circle piece and sl st in next st.
Once all the triangles have been completed, cut the yarn and leave a long tail for sewing.
Feet, make 2
Dark grey yarn and 3.00mm hook
ch 11, *sl st in 2nd ch from hook and the next 4 sts (photo 1), **ch 5, repeat from *(photo 2), repeat from ** (photo 3), when there are 3 “toes” sl st back down remaining 6 ch (photo 4).
Cut the yarn and leave a tail for sewing.
Beak
Black yarn and 3.00mm hook
Round 1: make 4 sc in a magic ring
Round 2: [sc, inc] x 2 (6 sts)
Round 3: [sc, inc] x 3 (9 sts)
Cut the yarn and leave a tail for sewing.
Assembly
With a yarn needle sew the feet, beak, and wings to the body.
Sew the hair to the top of the body. Note: There will be a gap where the skipped stitches are. The gaps can be closed as you sew the hairpiece onto the top of the body.
Chunky Amigurumi Crow Crochet Pattern
Materials
Super Bulky (6) yarn such as Bernat Blanket in blue, yellow, and tan or grey (for the legs/beak)
Super fine (1) yarn such as: Hobbii Friends Cotton in White
9.00mm, 7.00mm, 3.00mm crochet hooks
Stitch marker
Yarn needle
Stuffing, like this one on Amazon
Pattern Notes: Unless otherwise indicated, the pattern is worked in continuous rounds, do not join or turn at end of each round.
Use stitch markers to keep track of rounds and increases.
As with most amigurumi projects keep tension on the tighter side to ensure close and secure stitches.
The placement of eyes, beak, wings, and feet is entirely up to you.
When making stitches on the body I am working yarn under instead of yarn over hook. This creates a denser crochet fabric.
The finished crow is approx. 9” tall and approx. 24” around the middle (not including the wings).
Abbreviations (US Terms)
ch - chain
sl st - slip stitch
sc - single crochet
hdc - half double crochet
dc - double crochet
tr - treble crochet
dtr - double treble
inc - increase (2 sts in same st)
dec - decrease (sc2tog)
Body
With Blue yarn and 9.00mm hook
Round 1: make 12 sc in a magic ring
Round 2: [sc in next st, inc] x 6 (18 sts)
Round 3: [sc in next 2 sts, inc] x 6 (24 sts)
Round 4: [sc in next 3 sts, inc] x 6 (30 sts)
Round 5: [sc in next 4 sts, inc] x 6 (36 sts)
Round 6: [sc in next 5 sts, inc] x 6 (42 sts)
Round 7: [sc in next 6 sts, inc] x 6 (48 sts)
Round 8: [sc in next 7 sts, inc] x 6 (54 sts)
Round 9-12: sc in each st around
Round 13: [sc in next 17 sts, inc in next st] x 3 (57 sts)
Round 14: [sc in next 18 sts, inc in next st] x 3 (60 sts)
Rounds 15-17: sc in each st around
Round 18: [sc in next 18 sts, dec] x 3 (57 sts)
Round 19: [sc in next 17 sts, dec] x 3 (54 sts)
Round 20: [sc in next 7 sts, dec] x 6 (48 sts)
Round 21: [sc in next 6 sts, dec] x 6 (42 sts)
Round 22: [sc in next 12 sts, dec] x 3 (39 sts)
Round 23: [sc in next 11 sts, dec] x 3 (36 sts)
Round 24: sc in each st around
Attach safety eyes and begin to stuff body.
Round 25: [sc in next 4 sts, dec] x 6 (30 sts)
Round 26: [sc in next 3 sts, dec] x 6 (24 sts)
Round 28: [sc in next 2 sts, dec] x 6 (18 sts)
Round 29: [sc in next st, dec] x 6 (12 sts)
Round 30: dec x 6 (6 sts)
Cut the yarn and weave in the ends.
Wings, make 2
With Blue yarn and 9.00mm hook
Round 1: sc 6 in a magic ring
Round 2: inc x 6 (12 sts)
Round 3: [sc in next 2 sts, inc in next st] x 4 (16 sts)
Round 4: dec, sc in next 4 sts, dec x 2, sc in next 4 sts, dec (12 sts)
Round 5: sc in each st around
Round 6: [dec, sc in next st] x 4 (8 sts)
Round 7: dec x 4
Cut the yarn and leave a tail for sewing. Note: The wings are not stuffed so they can keep a somewhat flat shape - flatten the wings using the decrease placements from Round 4 to know where the creases should be.
Hair
With Yellow yarn and 9.00mm hook
Round 1: make 6 sc in a magic ring
Round 2: inc x 6 (12 sts)
Round 3: [sc in next st, inc] x 6 (18 sts)
Round 4: [sc in next 2 sts, inc] x 6 (24 sts)
Round 5: [sc in next 3 sts, inc] x 6 (30 sts)
Round 6: [sc in next 4 sts, inc] x 6 (36 sts)
Round 7: [sc in next 5 sts, inc] x 6 (42 sts)
Do not cut the yarn.
Create triangles by making a set of chains and working a series of sc, hdc, dc, tr, dtr. For example:
Triangle 1: ch 6, sl st in 2nd ch, hdc in next ch, dc in next ch, tr in next ch, dtr in next ch, skip 4 sts on circle piece and sl st in next st.
Triangle 2: ch 6, sl st in first ch, sc in next ch, hdc in next ch, dc in next 2 ch, skip 2 sts on circle piece and sl st in next st.
Once all triangles have been completed cut the yarn and leave a long tail.
Feet, make 2
With 7.00mm hook
ch 11, *sl st in 2nd ch from hook and the next 4 sts (photo 1), **ch 5, repeat from *(photo 2), repeat from ** (photo 3), when there are 3 “toes” sl st back down remaining 6 ch (photo 4).
Cut the yarn and leave a tail for sewing.
Beak
With 7.00mm hook
Round 1: make 4 sc in a magic ring
Round 2: [sc, inc] x 2 (6 sts)
Round 3: [sc, inc] x 3 (9 sts)
Cut the yarn and leave a tail for sewing.
Eyes, make 2
With White yarn and 3.00mm hook
Round 1: make 12 sc in magic ring
Round 2: [sc in next st, inc] x 6 (18 sts)
Cut the yarn and leave a long tail to sew onto the body.
Assembly
With a yarn needle sew the feet, beak, and wings to the body.
Sew the hair to the top of the body. Note: There will be a gap where the skipped stitches are. The gaps can be closed as you sew the hairpiece onto the top of the body.
**********
If you make this crochet haikyuu crow amigurumi pattern I'd love to see your creation, just tag me on Instagram @popsdemilk_crochet and use the hashtag #popsdemilk
**********
This pattern is for personal use only. The pattern and its photos may not be reproduced, distributed or resold, translated, published, altered, shared or posted in any way over the internet or offline.
You may sell finished items made from this pattern as long as it is handmade by you, not mass produced, giving the credit to Pops de Milk / Patricia Castillo as the designer. If you have any questions, you can email me at patricia@popsdemilk.com
This post contains affiliate links.