
Crochet Donkey Pattern
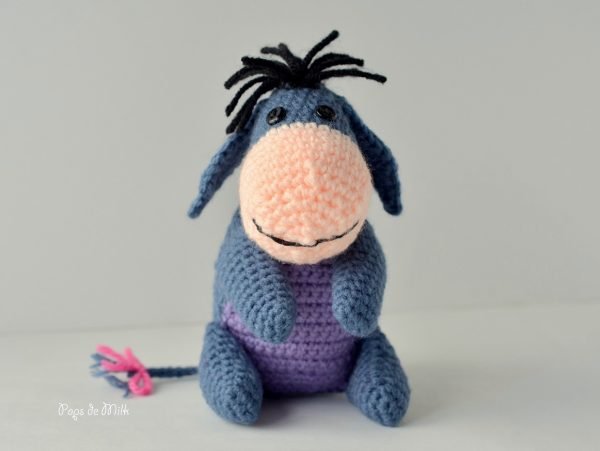
I am excited to introduce the latest addition to my amigurumi collection - a charming, melancholic donkey with droopy ears and a sweet smile! This little guy is perfect for those looking for a new crochet challenge or for experienced crocheters who want to expand their skills. With detailed step-by-step instructions, you'll have a blast bringing this adorable character to life. Whether you're a fan of classic children's stories or simply looking to make a unique handmade gift, this crochet pattern is sure to delight. So grab your hooks and let's get started on this adorable new project!
Keep scrolling for the free pattern or you can purchase the inexpensive and ad-free PDF pattern in my shop and on Etsy.
Crochet Amigurumi Eeyore Donkey Pattern
Size
Approx. 6” tall
Skill Level
Intermediate
Materials
Size 3.00mm and 3.50mm(4/E) crochet hooks
Approx. 100 grams worsted weight yarn such as: Red Heart Super Saver in Windsor Blue (A)
Small amount of worsted weight yarn such as: Bernat Super Value in Lilac (B), Peach (C), Black (D), and Pink (E)
Yarn needle
Buttons or safety eyes
Black embroidery thread and needle
Stuffing (polyfil)

Abbreviations (US terms)
ch - chain
sc - single crochet
inc - increase (2 stitches in same stitch)
dec - decrease (sc 2 stitches together)
hdc - half double crochet
dc - double crochet
work even - complete round without increasing or decreasing
Read Before You Start
Body:
The body is composed of two separate pieces, which are worked in Rows. Ensure that you sew these two body pieces together at the seams before beginning the neck.
Neck:
The neck is crocheted into the opening created by joining the two body pieces together.
Head and Legs:
The head and legs are crafted separately using continuous Rounds; there's no need to join or turn at the end of each round, and you don't need to create a starting chain at the beginning of each round.
Utilize a stitch marker to keep track of the beginning and end of each round.
Pay attention to any instructions enclosed in brackets [ ]. These instructions should be repeated the specified number of times within the same round.
If you're just starting out in the world of amigurumi, or you just need a refresher, check out my tutorials below:
Working in the Round - Part 1 (Increasing) and Part 2 (Decreasing)
Crochet Pattern
Body, back piece
With A and 3.50mm hook
Row 1: ch 19, sc in 2nd ch from hook and each ch across, turn (18 sts)
Row 2: ch 1, sc in each st across, turn
Row 3: ch 1, sc in first st, inc in next st, sc in next 14 sts, inc in next st, sc in last st, turn (20 sts)
Row 4: sc in each st
Row 5: ch 1, inc in first st, sc in next 18sts, inc in last st, turn (22 sts)
Row 6: sc in each st
Row 7: ch 1, inc in first st, sc in next 20sts, inc in last st, turn (24 sts)
Row 8: sc in each st
Row 9: ch 1, inc in first st, sc in next 22sts, inc in last st, turn (26 sts)
Rows 10-12: sc in each st
Row 13: ch 1, sc in next 11sts, dec twice, sc in next 11sts, turn (24 sts)
Rows 14-15: sc in each st
Row 16: ch 1, inc in first st, sc in next 22sts, inc in last st, turn (26 sts)
Rows 17-20: sc in each st
Row 21: ch 1, sc in first st, dec, sc in next 20sts, dec, sc in last st, turn (24 sts)
Row 22: sc in each st
Row 23: ch 1, sc in next 2sts, dec, sc in next 3sts, dec, sc in next st, dec twice, sc in next st, dec, sc in next 3sts, dec, sc in next and last st, turn (18 sts)
Row 24: ch 1, *sc in next 2sts, dec, repeat from * across, sc in last 2sts, turn (14 sts)
Row 25: ch 1, sc in next 2sts, dec, sc in next st, dec twice, sc in next st, dec, sc in last 2sts, turn (10 sts)
Row 26: ch 1, sc in next 3sts, dec twice, sc in next 3sts (8 sts)
Cut yarn and leave a long tail for sewing.
Body, front piece
With B and 3.50mm hook
Row 1: ch 11, sc in 2nd ch from hook and each ch across, turn (10 sts)
Row 2: ch 1, sc in each st across, turn (10 sts)
Row 3: ch 1, sc in first st, inc in next st, sc in next 6sts, inc in next st, sc in last st, turn (12 sts)
Row 4: ch 1, sc in each st across, turn (12 sts)
Row 5: ch 1, sc in first st, inc in next st, sc in next 2sts, dec twice, sc in next 2 sts, inc in next st, sc in last st, turn (12 sts)
Row 6: ch 1, sc in first st, inc in next st, sc in next 8sts, inc in next st, sc in last st, turn (14 sts)
Rows 7-11: ch 1, sc in each st across, turn (14 sts)
Row 12: ch 1, sc in first st, inc in next st, sc in next 10sts, inc in next st, sc in last st, turn (16 sts)
Rows 13-16: ch 1, sc in each st across, turn (16 sts)
Row 17: ch 1, sc in next 6sts, dec twice, sc in next 6sts, turn (14 sts)
Rows 18-20: ch 1, sc in each st across, turn (14 sts)
Row 21: ch 1, dec, sc in next 10sts, dec (12 sts)
Cut yarn and weave ends.
Neck and Body Joining
• Before you sew the pieces together, you’ll notice there are 8 sts remaining in the last row of the back piece. You will not be working into these stitches; instead, you will bring the first and last stitches together and sew the gap.
• Hold both the front and back pieces with the first row at the top and the last row facing downward.
• To join the sides together, connect Row 1 of the front piece (with 10 sts) to Row 1 of the back piece (with 18 sts). This connection will result in a total of 28 sts, which is where you will begin crocheting the neck.
• Important: When sewing, only stitch the sides and the bottom of the pieces, leaving the top part unsewn to create an opening for the neck.
Neck
The neck is worked in continuous rounds so there is no joining or turning at the end. With the back facing you, pick up a single crochet in the 3rd stitch from the right and continue to single crochet around. You might be thinking, "Couldn't I just pick up a stitch anywhere?" Well, I'm glad you asked because the reason the neck round starts in that specific stitch is so it begins to shape the neck, or the gloomy Eeyore-like hump. When you've completed the neck, stuff with fiberfill - the amount depends on how firm or squishy you want your donkey but I recommend going more on the firm side so the stuffing fills out the back of the neck, but not so firm that the body topples over from having a round base.
With A and 3.50mm hook
Round 1: pick up sc in 3rd St from row 1 of piece 2 and sc in each st, turn (28 sts)
Round 2: [sc in next 3sts, dec] around, sc in rem sts, do not turn
Round 3: sc in next 12sts along back, leave remaining stitches unworked
Cut yarn and leave long tail.


Head
With A and 3.50mm hook
Round 1: make 6sc in magic ring
Round 2: inc in each st (12 sts)
Round 3: [inc, sc in next st] x 6 (18 sts)
Round 4: [inc, sc in next 2sts] x 6 (24 sts)
Rounds 5-9: sc in each st
Round 10: [inc, sc in next 11sts] x 2 (26 sts)
Switch to C
At the end of Round 11 or 12 you can sew the buttons on or you can always sew them later but I find it easier to do before stuffing and closing.
Round 11: sc in next 7sts, inc in next st, sc in next 12sts, inc in next st, sc in next 5sts (28 sts)
Round 12: sc in next 5sts, inc in next st, sc in next 13sts, inc in next st, sc in next 8sts (30 sts)
Round 13: [inc, sc in next 4sts] x 6 (36 sts)
Rounds 14-15: sc in each st
Option to attach safety eyes or sew buttons
Round 16: [dec, sc in next 4sts] x 6 (30 sts)
Round 17: [dec, sc in next 3sts] x 6 (24 sts)
Round 18: [dec, sc in next 2sts] x 6 (18 sts)
Begin to stuff with fiberfill
Round 19: sc in each st
Round 20: [dec, sc in next st] x 6 (12 sts)
Round 21: dec x 6 (6 sts)
Cut yarn and sew shut. Weave ends.


Legs, make 2
With A and 3.50mm hook
Round 1: ch 4, inc in 2nd ch from hook, sc in next ch, 3 sc in last ch, continuing on bottom of foundation chain: sc in next sp, 2 sc in last sp, do not turn (9 sts)
Round 2: sc in each st around
Round 3: [sc in next 2 sts, inc] x 3 (12 sts)
Rounds 4-6: sc in each st around
Round 7: [sc in next 2sts, inc] x 4 (16 sts)
Rounds 8-10: sc in each st around
Cut yarn and leave a long tail for sewing.
Arms, make 2
With A and 3.00mm hook
Repeat Legs Rounds 1-3 then:
Rounds 4-14: sc in each st around
Cut yarn and leave a long tail for sewing.
The pattern for the limbs, as you can see, is pretty much the same with the exception of the hook size and an extra increase and rounds. The shape of the legs is a flat tube and this is achieved by starting with a foundation chain of 4 (instead of starting with a ring, which would create a round tube shape).
Ears, make 2
With A and 3.50mm hook
Ch 13, sc in 2nd ch from hook and next 2ch, hdc in next 2ch, 2 dc in next ch, dc in next ch, hdc in next 2ch, sc in next ch, sl st in next 2ch, ch 1, continuing on bottom of foundation chain: sl st in next 2 sps, sc in next sp, hdc in next 2 sps, dc in next 2 sps, hdc in next 2 sps, sc in next 3 sps
Cut yarn and leaving a long tail for sewing.

Assembly

The reason amigurumi is such an awesome form of crochet is that it gives the crocheter an opportunity to make something with character. I'm not saying all other crochet projects don't have character - believe me, there are some scarves and hats that have plenty of character - but with amigurumi you can give your creations facial expressions that bring emotional responses. For example, the expression on the grey alien I made ages ago always makes me want to giggle and the facial detail on Tree Trunks makes me go "Awww!" For the most part I've only made happy or excited features but there are so many other expressions you can make, don't feel limited to making a content-looking Eeyore :) Next we’ll add details to the head!
Stitching a Mouth
It doesn't really matter in which order you do the mouth, the ears, or the hair but in my example, I made the mouth first.
I used stitch markers to guide me in making the mouth. Embroidery was a bit daunting for me at first so if you get lost this is the video, on Nerdigurumi, that helped me out when I was first learning how to embroider details on amigurumi.
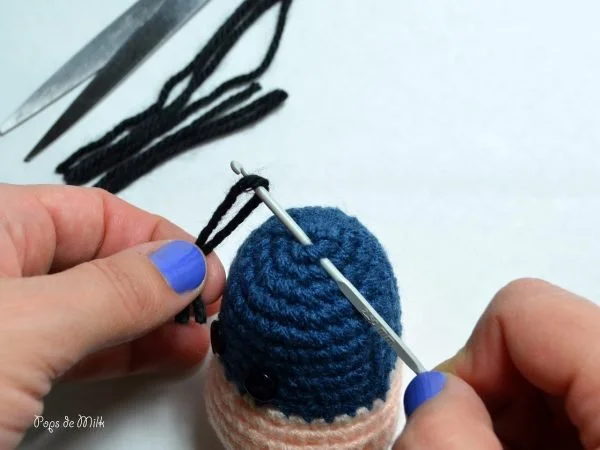
Attaching Hair
With size 3.00mm hook (or smaller if you have one) pull each strand into top of head: make a loop with the strip, insert the hook in chosen space, then pull loop through but not all the way, wrap remaining two strands around hook and pull them through the loop. Pull tight and repeat until there are enough strands to make a cute tuft of hair. Trim strands to give shape. Alternately you can make a small hair cap by crocheting a small circle and pulling the yarn strands into the circle first and then sewing the circle to the top of the head.
With a yarn needle sew the ears to the top sides of the head.

Position the head over the neck opening as though Eeyore is touching his chin to his chest hehe...It's a little awkward but just take your time to evenly sew the head on.

Next, sew the limbs onto the body.

Tail
With A and 3.00mm hook
Leave a long starting strand of yarn and then chain 13. Cut yarn leaving about an inch of yarn at the end making sure to pull the end through the last ch loop to knot it. Pull the strands apart to make it look more like hair. With a small bit of pink yarn tie a bow just above the frayed “hair”. If needed you can use sewing thread and needle to secure the bow on the tail. With yarn needle sew the tail to Eeyore.
Congratulations, your amigurumi Eeyore is done!


If you make this crochet donkey amigurumi I'd love to see your creation, just tag me on Instagram @popsdemilk_crochet and use the hashtag #popsdemilk
**********
This pattern is for personal use only. The pattern and its photos may not be reproduced, distributed or resold, translated, published, altered, shared or posted in any way over the internet or offline.
You may sell finished items made from this pattern as long as it is handmade by you, not mass produced, giving the credit to Pops de Milk / Patricia Castillo as the designer. If you have any questions, you can email me at patricia@popsdemilk.com